


Have you ever wished for it to be possible to just magnetically attract new high-quality, well-targeted leads to your business?
Well, HetHunt has marvelous news for you! There is, in fact, a way to do that. All you need is a well-crafted lead magnet and a little bit of luck.
After reading this article, you will have both.
What Is a Lead Magnet?
There isn’t a set definition of a lead magnet. It’s anything and everything that is of value to your prospects and that they would be willing to exchange their contact information (usually, email address) for.
Each lead magnet has three essential components it consists of:
- Web form: The form linked to the lead magnet, which collects all the necessary contact information about the visitor - the visitor’s name, email address, phone number, etc.
- Content: What you essentially offer to your visitors in exchange for their contact information.
- The delivery email: The email that is sent to the visitors who fill out the web form. It contains the content the visitor is seeking, either in the form of a file attachment or a link.
You can also include the fourth element, a thank-you page. It’s the webpage the visitor sees upon filling out the form or downloading the content in question. While it’s entirely up to you whether or not you want to add a page like this into the mix, it’s a great way to show your appreciation and kickstart the relationship with your new lead.
Depending on the content you decide to use for your lead magnet, it’s possible to distinguish between lots of different types of lead magnets. You’re only limited by your website host’s capabilities and your imagination when it comes to deciding on what content you want to use to attract new leads to your business.
Here are the top-7 most popular lead magnets formats:
- An e-book. A classic is a classic. E-books are the long-form format for you to showcase your expertise and go into detail.
- A cheat-sheet. Everyone needs a little downloadable, printable and actionable item to make their life easier. Cheat-sheets do just that - they essentially boil down all the information to a single page of specific, snappy advice.
- A toolkit. The tools you include in your downloadable toolkit can range from calculators to templates, to other documents that can help your leads succeed.
- Software free trial. Make the conversion easier by tying your lead magnet directly to the product you offer.
- A webinar. Invite your prospects to listen to your in-house experts talk about important topics in real-time, or provide them with a recording of the webinar.
Regardless of the shape, composition and format of your lead magnets, they all have one thing in common - their goal is always to maximise the number of targeted leads you are getting for an offer.
Why Do You Need Lead Magnets?
There are numerous benefits of developing and using lead magnets in your marketing and sales strategy. Here are just a few to name off the top of my head:
- Lead magnets help you establish yourself as a thought leader and show off your expertise.
- Lead magnets raise your brand awareness. By creating high-quality content, you encourage people to share it with their networks and, therefore, make your brand known to the target audience.
- Lead magnets provide businesses with an opportunity to showcase their products.
- Lead magnets allow you to build trust.
- Lead magnets help you to grow your email list. When done right, lead magnets convert your website visitors into warm leads on your email list.
How to Create a Powerful Lead Magnet to Attract High-Quality Leads
Step 1: Choose Your Buyer Persona to Target Specific Prospects
If you want to produce hyper-personalised, targeted lead magnets, you need to know exactly who you’re aiming at with those. While most companies have several buyer personas they target with their product or service, it’s important to only stick to one per each lead magnet.
Don’t sweat it too much about choosing the correct buyer persona to target. Even if it goes wrong at first, as you keep producing more and more lead magnets, you will eventually have one for each segment of the audience. Instead of putting an overwhelming amount of effort into deciding who you need to target first, just think about the buyer persona that you can provide the most value to right now, and move from there.
Here’s a list of characteristics you could consider when profiling your audience:
- Background - Career path, job, current position, etc
- Demographics - Gender, age, location, etc.
- Identifiers - Demeanor, communication preferences
- Goals - Primary and secondary
- Challenges - Primary and secondary
NetHunt's example:
The buyer persona for our The Cold Outreach Guide is:
Demographics. Age 25 - 50 (25-35 core), geography: USA, Canada.
Background. Job title: sales manager, sales rep. 1-3 years of experience in sales.
Identifiers. Goals and values: ambitious, money motivated, goal-oriented, highly-organized; loves talking to people, communicating with leads and clients.
Goals. Wants to build solid relationships with clients. Wants to close deals and reach/exceed sales targets. As a result, get bonuses and advance career.
Challenges. Hates manual input of data into CRM, thinks of CRM as tool management uses to control, rather than support. Afraid of being ineffective, of losing deals and having personal income reduced.
Step 2: Pinpoint Your Value Proposition
Once you know who you’re targeting with your lead magnets, you need to think of what they need the most and what you can offer them to satisfy that need. The overlap of the two - is your value proposition, a lucrative offer that will draw in new leads.
It’s thinking time!
That’s the step where you need to brainstorm lots of different ideas to come up with a solution that would be easy and straightforward, yet specific and, ideally, tied to your company’s product offer.
Instead of trying to create something you think your prospects could be interested in, figure out what they already need and deliver just that.
If you’re stuck, don’t worry, NetHunt got a little instruction for you to identify your value proposition quicker:
- Make a list of every benefit your product has
- Explain why these benefits are valuable
- Pinpoint your potential buyer’s main problem
- Connect this value to your buyer's problem
- Differentiate yourself from your competitors that also offer this value
NetHunt's example:
Ebook The Cold Outreach Guide.
Step 3: Decide on the Type of the Lead Magnet Your Want to Employ
Once you’ve identified your value proposition, it’s time to think about the format that works best to convey it to your potential leads.
Some of the things to consider when deciding on the format include:
- Keep it simple - A lead magnet too complicated isn’t going to attract many people; you need to make it accessible in order to make it valuable and digestible.
- Focus on your strengths – Your lead magnet needs to be top-notch, so go with what you’re most passionate about and comfortable with. Perhaps, you’re a great writer, or maybe videos are your cup of tea.
- Prioritise rapid consumption – Choose a format that allows fast delivery and consumption to make sure your prospects don’t spend too much time interacting with your lead magnet but slide down the sales funnel instead.
At the beginning of this article, we’ve talked about the most popular types of lead magnet, and they were almost all heavily content-based. Indeed, an e-book, an infographic or a whitepaper can be extremely valuable to your target audience, but you shouldn’t limit yourself to just text and pictures.
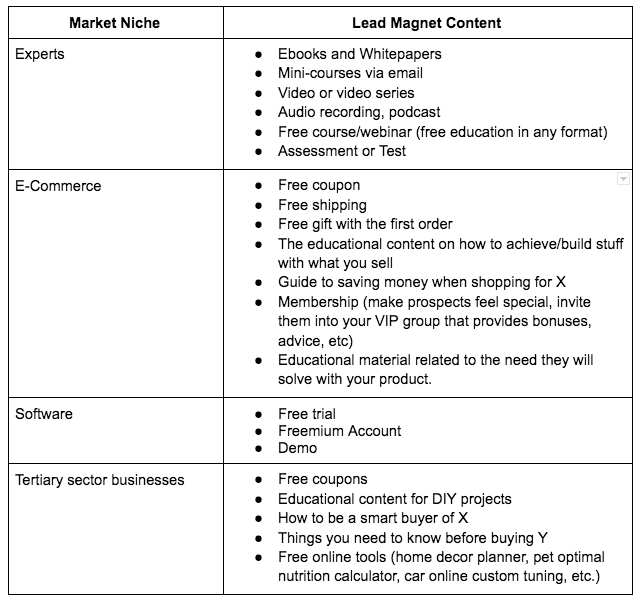
In fact, customers in certain niches might find other, more tangible offers to be more valuable. Here are a couple of ideas as to what you could use as a lead magnet for different business niches:
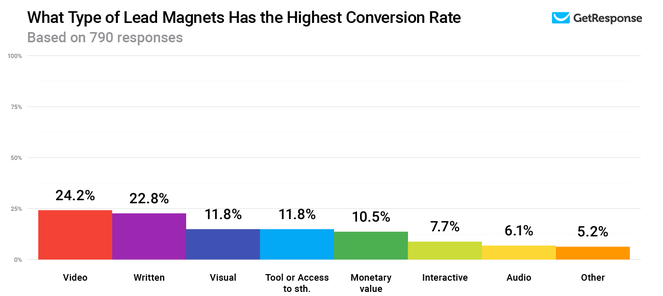
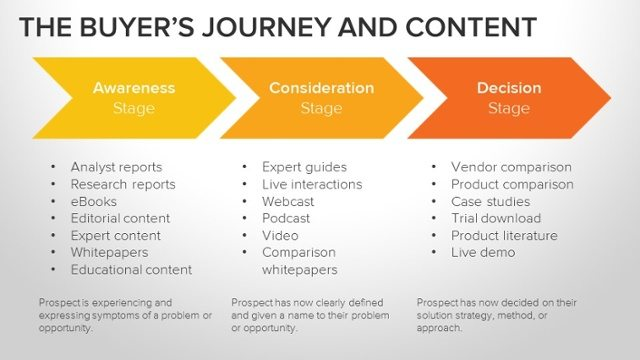
There’s also correlation between the stage in the buyer’s journey and the content formats that perform the best. So, if you’re looking to attract a specific type of leads, you might benefit from the following lead magnet format distribution:
Step 4: Ensure You Provide Real Value
When researching opinions for this article, I’ve come across all kinds of expert advice. Surprisingly enough, a lot of experts recommend turning to a ‘super time-effective, easy lead magnets creation method’, which really is just... re-using your old star content pieces, blog posts in particular, and presenting them to your website visitors as brand new lead magnets.
You know how it goes, choose one of the best-performing articles, convert it into a PDF, protect it with a lead-gen web form. Done!
While it’s definitely a fast way out, is it really the best one? To an extent, this defeats the very purpose of lead magnets and strips them off of one of the key benefits - building a trusting relationship with potential customers. Essentially, you’re tricking them into believing they’re getting some exclusive valuable content in exchange for their contact information, while really, it’s just something they could’ve gotten their hands on just by scrolling through your blog. Cheating!
If your visitors don’t see the real value in your lead magnets, it can have serious adverse effects on your brand image and reputation.
To avoid falling into that trap, make sure you:
- Deliver the exact resource (in shape and content) which you promise on your lead-gen form.
- Regularly update your content to keep it relevant and up-to-date.
- Craft your content resources in such a way that they’re easily understandable.
Step 5: Give Your Lead Magnet a Name that Drives Attention
Every element of your lead magnet needs to contribute towards its overall success. Every little detail can make or break your offer. So you don’t have the privilege of approaching the process of naming your lead magnet nonchalantly.
‘On average, about 8 out of 10 people will read a headline, or in this case, the eBook’s or checklist’s title. But only 2 out of 10 will read the rest’.
[Copyblogger]
That’s why you need to make sure your lead magnet’s title pops! It has to have all it takes to attract the prospect’s attention and motivate them to fill out the signup form. Your lead magnet title needs to be eloquent, eye-catching and straight to the point.
There are quite a few practices that can help you achieve that:
- Mention exactly what your lead magnet is about - while it can be tempting to use sassy puns to show your wit, nothing engages high-quality leads more than exactly what they’re looking for
- Stick to the How-to format titles - they give a promise of actionable information, they focus on a specific problem and... they just perform better!
- Make a bold statement and promise something grand - you need to make it obvious to your prospects that your lead magnet contains all they could possibly need, and they don’t have to look elsewhere for the information they can obtain from you.
- X Reasons why - establish your expertise and show who’s daddy in the business by letting your prospect know you’re a veteran of the problem and know all about it; naturally, you have a solution, too.
- Ask a thought-provoking question - it doesn’t matter how uninterested you are, it doesn’t matter how busy you are; whenever your brain spots something worthy of attention - it can’t help but think about it.
To master the art of lead magnet naming, give a read to this article.
Step 6: Create a Web Form
Finally, when everything else is hot and ready, it’s time to set up the web form for lead capturing and craft the content.
Luckily, web form creation and lead capture is easy with NetHunt CRM. We’ve recently rolled out a new feature called ‘Workflows’ that takes the hard work out of working hard by automating all these processes.
With NetHunt, you can set up a web form for your lead magnet in a couple of easy-peasy steps.
-
Start a new Workflow
On the main page of your Gmail inbox or NetHunt dashboard, open Workflows (hint - you have to scroll down the left-hand side panel until you find the lightning bolt icon). Search the upper-right corner of your screen to find the New button. Give your Workflow a name, and congrats, you already have a new Workflow.
-
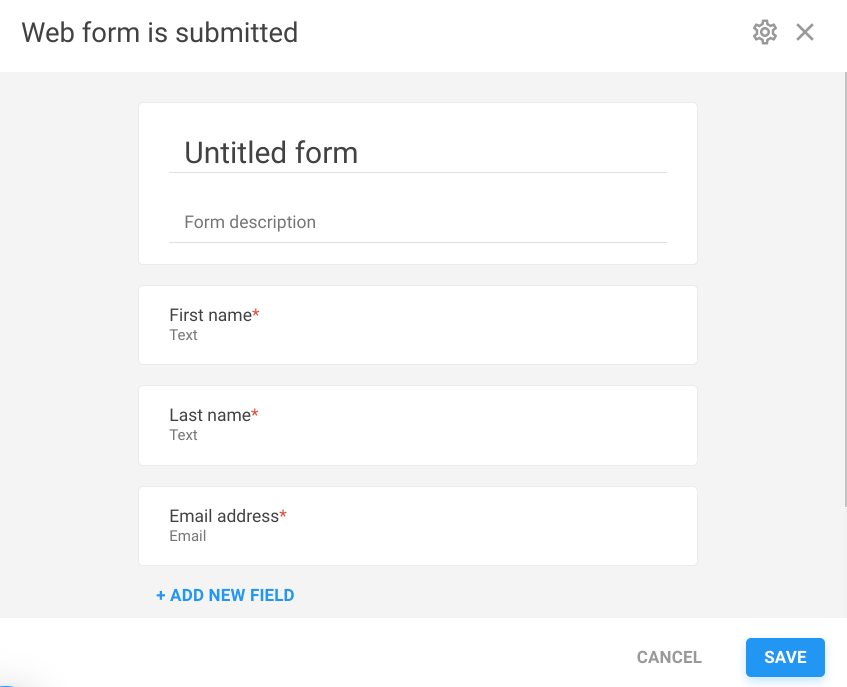
Add a trigger to set off your Workflow
Click on the Add a starting trigger button in front and centre of the page. Select ‘Web form is submitted’ from the “Start my Workflow when a…” drop-down menu.
-
Create your web form
Using the NetHunt web form builder, craft the web form that fits your needs. You can rearrange, add and delete different fields to customise your web form:
Make sure you edit all the fields the way you want them to be and give your form a title and a brief description. There’s also a way to alter the text on your submit button, so give that a try, too. By default, your submit button will ask the visitors to “Submit” the form, but if you’re interested in other CTAs, you can change it to “Enter” if you, say, run a competition; or “Reserve” if you invite people to join a webinar.
-
Alter the appearance of your web form
This is up to you, but considering that a lot of salespeople are using lead magnets to raise their brand awareness and further build their brand, it’s likely you don’t want to skip this step. NetHunt’s Workflows allows you to customise the form template style, which is basically the colour scheme of your form; the title of the success page which submitters will be redirected to upon form submission; and the message they’ll see when they get the delivery email.
-
Preview and share your web form
Once you’re done customising the web form, it’s time to hit the road and place it on your website. You can easily do that, using one of the three following methods:
- Link. Share the link and your web form opens in a separate browser tab.
- Dialog box. A code that to insert under a button on your website. Once a lead clicks the button, the web form pops up in the same tab.
- Embed. Embed the form in your webpage, making it fully visible to leads straight away.
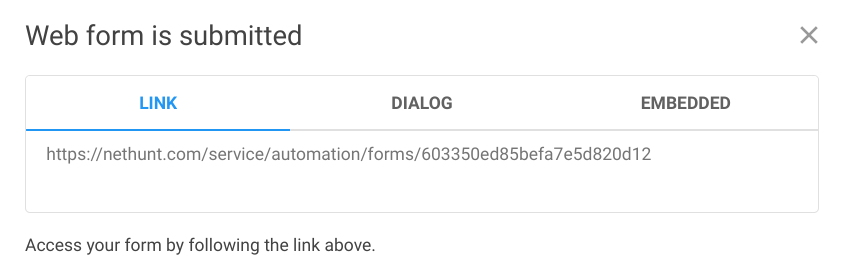
Just make sure you preview your web form beforehand. You want to be sure everything is perfect just the way you intended it to be!
Read more about the best web form practices here!
Then, get your creative team ready and produce that piece of extremely valuable content all your leads are waiting for. We’re sure you already know your ways here.
Step 7: Test Your Lead Magnets
Almost there, pal. You’ve got one more thing to do - see if your lead magnet is as fabulous as you think it is. If you have followed every step up to here, we don’t doubt that it’s going to be a success. But unless we’re your direct target audience, it’s worth getting a second opinion.
The most reliable way to test your lead magnet and reach the closest thing to perfection is to turn to A/B testing.
However, there are other ways of finding out whether your lead magnets are hot or not. Just to name a few:
- Send it out to a small group of existing customers to get their feedback.
- Suggest your lead magnet to more knowledgeable business friends for an honest review.
- Post it online, for example, in a Facebook group and get the internet users’ opinions on it.
Lead magnets aren’t that scary when you know how to tackle them. Treat them as an opportunity to generate more leads rather than a burden you need to deal with. And it will pay off!
P.S. One final piece of actionable advice - for the best results, make sure you promote your lead magnets online - social media are great for that!


 product experts — let's find the best setup for your team